My Rain Drop birdhouse was recently featured in the Globe and Mail!
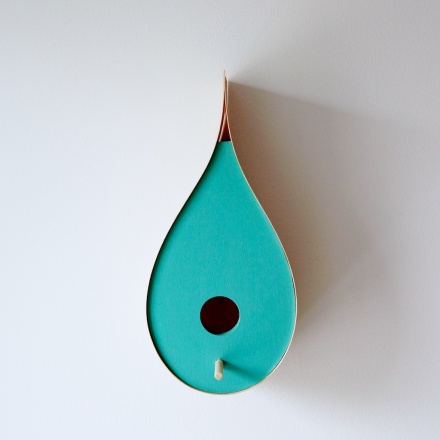
Follow THIS link to read the article.

My Rain Drop birdhouse was recently featured in the Globe and Mail!
Follow THIS link to read the article.
It’s springtime which can only mean one thing, a whole bunch of new stockists have come on board. It’s always great to expand my reach of retail space, and while I’ve covered many parts of Ontario, I still need to find a few Western shops, contact me if you’re in Western Canada and interested in stocking my products, always keen to add more shops!
Here are a few of my latest shops, checkout the links, or even better, swing by their store if they’re close by!
LEN – Purveyor of Democratic Goods – Toronto, Ontario
Cherry Picked – Merrickville, Ontario
The General – Picton, Ontario
For a full list of stockists and addresses, please visit my stockists page. Or go to Craftcollective.ca to shop online.
I was finishing up a set of kitchen drawers this past week for a client. While they aren’t a style I would design myself, they were a big improvement structurally on what they had and it would match the rest of their cabinets in both grain and colour. This is no easy feat as the red oak in their kitchen had darkened with age, so while the rest of the cabinets have a clear varnish, these drawers needed staining to match the rest. The drawer boxes were made from baltic birch and I was using some heavy duty glides. I was proud of what I had made and couldn’t help but think how much of an improvement over their old drawers this would be.
Then my mind wandered to our own kitchen. Some drawers are had to open, some don’t open at all. The construction is pretty horrible and they get worse every week. You see, while I make furniture, good furniture, for all sorts of people, the one person I don’t make it for is myself. While I’ve made several beds, our mattress sits on the floor. Do I make tables? You bet! But we use one my parents got rid of 30 years ago. Desks? We have a door propped up on a book case. The problem is at the end of the day, clients pay me to make furniture, I don’t pay myself to make it. So I’m far better off building furniture for other people than I am for myself, at least financially. The one exception is my daughter. I’ll build her anything, it might take a bit longer to do, but she has some of the nicest furniture in our house.
Now while this is good financial sense, it does lead to an unattractive living space (some would say college dorm style). And some days you walk into your room, see the mattress on the floor, and think, why don’t I have a nice bed?
So my new goals are to own furniture as nice as I make. This means I don’t have to make all of it, but if I buy, it needs to be as good if not better than I can make it. I think this will give me great practice in trying out new designs on myself, and it will help pad my portfolio to show others what I am capable of.
What’s the first piece? Either desk or bed, I’m on the fence. Desk would be faster, but bed would be nicer. Stay tuned… (although it might take a while)
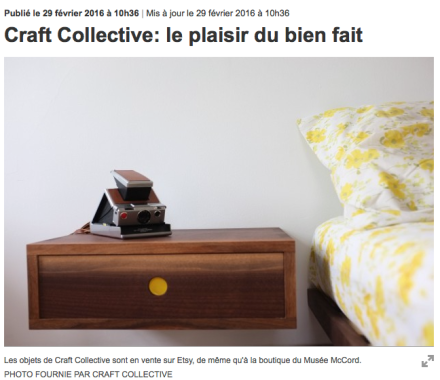
I was interviewed a few weeks back by a journalist from La Presse, I’m always a bit reluctant when approached by media as I find my words never seem to come out the way I hope. I tried to convince the journalist to let me answer questions via email but she was insistent on a phone interview.
Well, my fears were not warranted at all. Last Saturday the article was published in the print and tablet edition of La Presse and it’s without a doubt the best article I’ve ever had written about me. I can’t get over how well it was written, it’s exactly what I would hope it to be!
I’ve since had a huge spike in traffic on both my Etsy Store and my online store, especially from the Quebec region of Canada (where I live) which is great to get so much local recognition.
The CNC arrived this week, and am I ever glad I had it shipped. It was very heavy, very awkward to lift, and the drive alone would have taken 8 hours each way. After unpacking there was a bit of damage as it hadn’t been crated so a few little issues, most likely due to us loading it off the truck. Luckily two switches were easily reattached and a new drag train is on order for minimal cost. Honestly I didn’t see the machine in person so maybe these were issues before, who knows.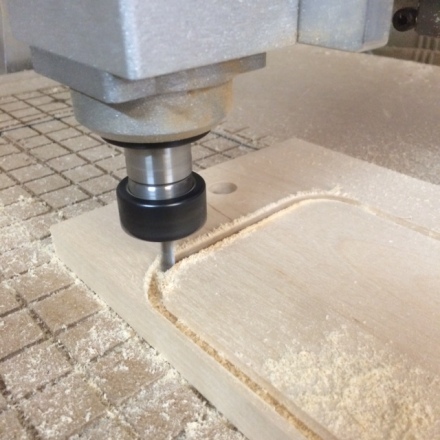
After a day of set up, I was pretty surprised how fast it was up and running. The drive computer has Cut 2D on it, so I’ve been using that for now, although I plan to get Vectric Pro when funds allow. I now need to build a table for it to get it up off the floor. I’ll make something with casters on it so I can move it around if need be since it’s currently blocking the loading door of my shop. The door isn’t used that much but it may in the future so having the ability to move a 330+ lb. machine would be nice.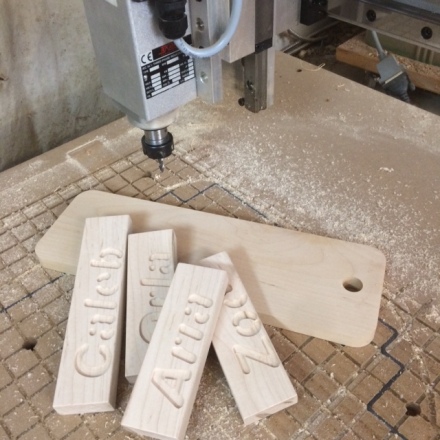
Lots of future plans now as I begin to learn all the potential of this machine.
I’ve been in love with CNC routers ever since I first heard about them over 10 years ago now. I’m generally fairly impulsive, but for some reason this time I waited, and waited, and waited.
Over the years I bought a “how to build your own CNC” book, I’ve read countless web pages, and almost bought an X-carve from inventables last year. But as the years went by my interest turned from hobby to business, and so my needs changed. I have very little free time, and I can’t justify spending work hours to build a machine when I need to be making things to make money. I know you can argue that building this machine would help me make money later on, but I’m not convinced the savings would work out in the end. Another issue is I’m pretty impatient, and I might not follow every step, or complete each operation, and chances are the machine might not be perfect, and that will lead to less than perfect cutting, which will drive me crazy. The Inventables option seemed better, but not so sure if it would put up with commercial work.
So last week I figured I had enough money in the business account, and there was an ok deal on a CNC. After several days of emails I had just about bought the machine but started to get a funny feeling from the private seller, and was getting frustrated with his communications, so called it off. The next day I found another machine, slightly different size, slightly more money, but still a decent deal. Then today looking at old Kijiji listings, I saw a CNC for sale but I was sure it was long gone. I contacted the owner in the off chance it was still for sale, and it was! The price was better than the other two machines, and while a bit further from me, I agreed to purchase it.
Due to the distance from me, it’d take me 2 days to go there and back to get it, plus cost me a rental van, gas, food, accommodation, etc. So I hired a shipping company, that way it gets to my door and I can spend those days catching up on projects that have fallen behind a bit lately. We’ve had so much snow this week that I’ve spent more time shovelling that woodworking it seems.
Hopefully I’ll have the machine by the end of next week, then I have to figure out how to use it!
Not much more to write really. Some weeks the projects fly off the list and get done at amazing speeds, other weeks I just spin my wheels. It didn’t help that there were two PD days this week, but a faulty electrical socket and a broken coffee maker in the bakery certainly didn’t help move things along either.
In the end I managed to finish off some iPad stands and some charcuterie boards, but I had hoped to be much further ahead in prep for One of a Kind at the end of next month. Came close to buying a used CNC machine but I took too long to reply and missed out on a decent deal. I’m beginning to realize more and more how a CNC could help me out, only a matter of time before I buy one.
Next week will be better, not sure how, but they will.
It’s been three years now that I started my professional venture into woodworking. What was once a hobby is now my full time job and so far it’s paying the bills. The goal was to sell small runs of custom furniture, not one-offs, but limited editions. For the area I live I don’t feel there is the customer base for bespoke pieces designed and created for one customer alone. I do think there is room for small runs, enabling me to make jigs in order to speed up the production process but not making such huge numbers that it becomes mind numbing.
Where am I going with all this? Good question. When I started I decided the best route to get me to my furniture goals was to start with small items, cutting boards, bird houses, wood toys, etc. These items can be fun to design and make, and selling them at craft shows definitely spreads the word about who I am and what I do. I also ended up in many shops selling my products wholesale. This was even better as the sales were guaranteed and much less time me being a salesman (something I hate) and more time me actually making things (something I love).
The only issue is you end up making what you make. By this I mean if you always make cutting boards, you’re always going to make cutting boards. Sometimes you need to throw yourself out there and start new projects, projects that might not pay, might not work, but new things. Making salad servers or iPad stands is a good way to help pay the bills, but I can’t say I’m fulfilled at the end of a day making these items.
To this end I’ve not signed up for any craft shows this year. I’m doing one last big show in Toronto (One of a Kind) and that’s it. I’ll still work on wholesaling to shops, custom canoe paddles, and I might try an art show in the fall, but for now I’m going to take some time, time where I won’t be making money, and start building the furniture in my many notebooks. I have a lot of designs that have never left the pages of my books, and it’s about time I get started on them. Will they sell? Who knows, but they definitely won’t if I don’t make them!
Stay tuned, this could be an exciting year…
I’ve been dreaming of a CNC for years… I once bought a book on how to make your own CNC and even had some money set aside for the parts, but things got busy in life, we moved a fair bit and lugging around a piece of equipment that size just didn’t seem practical. Now that we’re settled a bit more, and my woodworking/design business is growing, my thoughts have been led back to the idea of a CNC.

I make a lot products that require precise repetitive cuts. To this point I’ve done this mostly by hand, drawing the parts out, cutting close with the bandsaw, and sanding to the line. For some items I’ve rigged up a jig for my router, but all of these would be simpler with a CNC. Some products have tested the limits of my current tools, while others just aren’t worth making due to the amount of time it takes vs. how much people are willing to pay. While a CNC would have an upfront cost, it would allow me to start it running and then work on other projects while it cut out parts. Three things have been stalling my purchase so far: 1-cost, 2-know how, 3-man vs. machine.
 1- Cost: Fairly obvious one, these machines aren’t cheap. I’m used to powerful woodworking tools that have had little change in the last 50 years, meaning my 40 year old Unisaw is the same product as one bought today, except mine costs 1/10 of the price and all parts are metal instead of practice. There aren’t many used CNC’s around, and they are getting better all the time so newer IS better.
2- Know How: While I was once a computer geek, writing computer programs as a kid, I haven’t done as much of this recently, and it’s a bit overwhelming to figure out where to start, how to use the software, and which one to use. I see lots of people saying it’s pretty simple and you’ll learn fast, but I’m not convinced so far.
3- Man vs. Machine: I work with both hand tools and machines. I’m not partial to either, although hand tools are quite and generally make less sawdust which is always nice. I use the best tool for the job, and the reality is that often that is a machine because time is money, and this isn’t a hobby for me. But the other day I heard someone saying that if it’s made by a CNC, it takes away from the artistry of it. It’s an interesting comment, but if we look at painters, no one criticizes them for selling prints of their work instead of one off works of art. I see a lot of product descriptions of makers stating things are “hand carved”, “hand dipped”, “hand made”, etc. What is interesting is my wife runs a bakery, one of her best selling products are Macaron. In order to make these, you whip egg whites, which she does with a commercial mixer. Would people pay more if she whipped them by hand? Likely not, she’d probably just get huge biceps and a case of tendonitis. The truth is, my products cut by a CNC would be more accurate than me cutting them, so resulting in a higher quality item for my customer, so it seems like everyone should be happy with this?

Where am I going with all this? Well last night I stumbled across the Inventables website, they just came out with a new product called the X-Carve which is a CNC that you assemble yourself. They’ve really put some thought into this machine, enabling you to customize size, motors, and spindle all to your liking (and budget). There are reviews starting to come out across the net and they are very positive. It’s great to see so many actual woodworkers reviewing this product as it gives confidence to someone like me that I’m just as capable to make great use with this CNC.
It also addresses my issues…. The price is very affordable, especially since you can configure it to your needs, and the testimony from other woodworkers has really helped me to believe this is something I can handle and learn fairly quickly. As for the Man vs. Machine debate, the more woodworkers I see using this CNC, the more I feel it’s just another tool in my shop, one that has infinite possibilities for my woodworking business.
So am I buying one? Not sure on this. While it’s affordable, it’s still a fair chunk of change, and once it arrives I still need to assemble it and start learning how to use it. This might be a great summer project as my shop is not air conditioned and it gets really hot and humid here, so tinkering is much nicer than sweating buckets while making things. Summer is generally slower for my shop, so a great time to learn new things.

One other thought I’ve had is my 5 year old (seen above when much younger) loves to make things with me. I think this could be a real fun item for Sunday mornings, she can dream up something, sketch it on the computer, and head out the shop to make it. Just for that purpose it would be worth it in my books. I’ll keep you posted what I end up doing…

Whenever I make something, I always try to incorporate some new skill so that I can learn while creating. This time I went a little over board. My daughter was in need of a lap desk to replace the dollar store plastic one that had an untimely death when she used it for steeple chase practice in the living room… My father made my brother and I two such desks when we were kids, except that he simply used three pieces of plywood and some piano hinges (in hindsight, not a bad idea to be honest…). I decided I was going to go much more upscale!
My mid century modern inspired lap desk started out as a way to practice bending plywood. I made the apron of it from several layers of 1/8″ baltic birch plywood that I bent around a form. Then I attached it to the top which I decided to veneer with some walnut I had lying around. I was using the white glue and iron technique which unfortunately led to a few large cracks. This meant I needed to do some inlay to cover up these cracks. The legs were made using angled bridle joints, and finally the top was coated with an epoxy finish. Did I mention I had never done any of these skills before?
The final piece is not something I am truly proud of, there are many “first time” mistakes which I have learnt from and will be better able to handle next time. It’s only failing if you aren’t learning after all right? I do like the design, and some of the techniques I’ll try again (bridal joints), and some I won’t use (vacuum press veneering would lead to a much better finish). There should be more furniture pieces showing up on the blog throughout the spring, so stay tuned!
